Introduction
In this blog post I attempt to demystify physical memory exploitation on Windows and how we can abuse the right physical memory primitives to gain control and manipulate system memory. First, we’ll briefly revisit the relationship between virtual and physical memory before diving into a crash course on page translation and how address translation works on AMD64 systems. Next, we go over physical memory primitives and how these primitives can be leveraged. Even though most of the techniques covered are universal on the AMD64 architecture, we will use an (as of 22-09-2024 up to date) Windows 11 23H2 machine as our target machine.
Virtual & Physical Memory
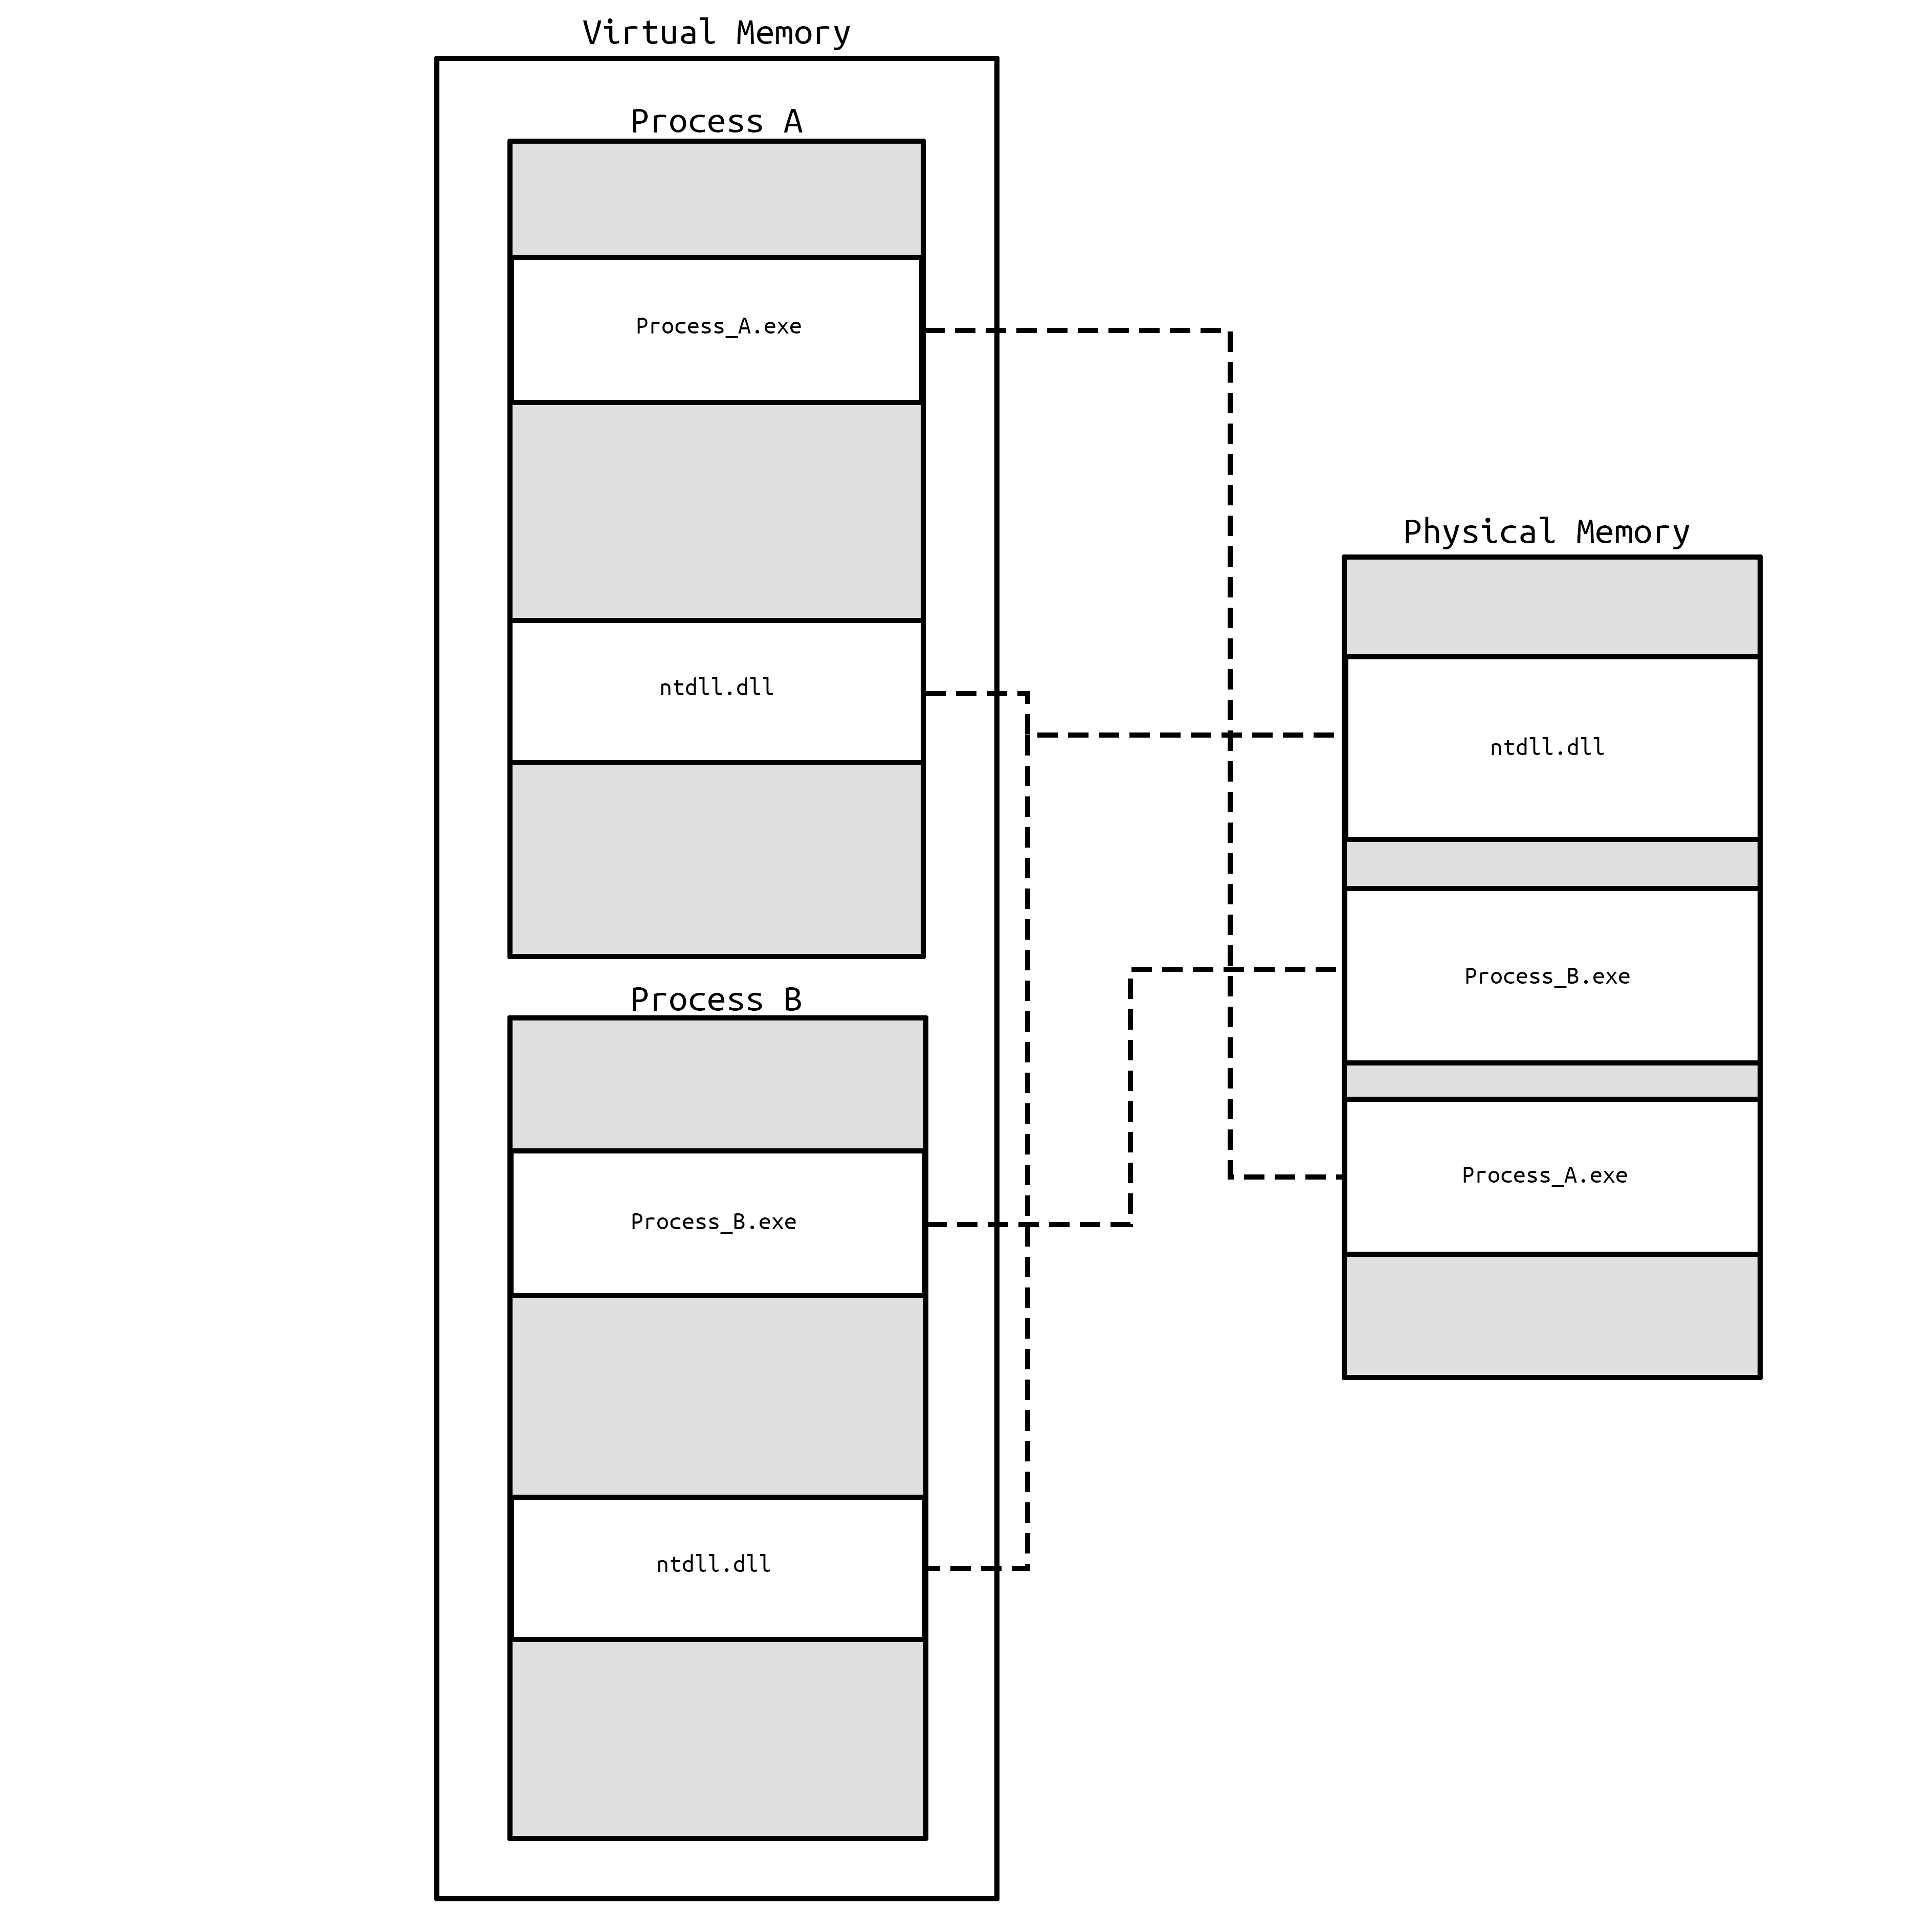
In modern systems, virtual memory allows each process to operate in its own isolated memory space. The AMD64 architecture supports this separation through a mechanism called Page Translation. This mechanism allows virtual addresses to be mapped to physical memory, letting the operating system efficiently manage memory by isolating processes while optimizing resource usage. By doing so, the OS can control which areas of physical memory are shared between different process contexts, which is important for optimization reasons.
For instance, the Windows memory manager can map the ntdll.dll library into physical memory just once, while mapping it within multiple process contexts, allowing each process to access it as needed without unnecessary memory consumption.
Let’s take a closer look at the page translation mechanism and how it works under the hood.
Page Translation Crash Course
The AMD64 architecture extends the legacy x86 system by expanding the ability to translate 32-bit virtual addresses into 32-bit physical addresses, now allowing for the translation of 64-bit virtual addresses into 52-bit physical addresses. This increase in addressable space enables modern systems to handle vast amounts of memory. The translation between virtual and physical addresses happens through a hierarchical set of translation tables (also referred to as page tables). Lets have a look what these hierarchical tables look like.
Translation (Page) Tables
The process of translating a 64-bit virtual address to a physical address happens through a hierarchy of page tables. Each level of this hierarchy represents a different stage in the translation process, and the system uses specific bits from the virtual address to navigate through these tables. By extracting certain bit ranges from the virtual address, the corresponding offset for each table can be determined.
The hierarchy consists of four levels of translation tables:
Page Map Level 4      (PML4)  Bits 47 - 39
Page Directory Page   (PDP)   Bits 38 - 30
Page Directory        (PD)    Bits 29 - 21
Page Table            (PT)    Bits 20 - 12
Page Offset                   Bits 00 - 11

This means that any virtual address on AMD64 systems follows a specific structure that divides the address into several fields. Each field corresponds to an index used to navigate through the hierarchical page tables until the physical address is reached.
We can break down this structure within the following code:
typedef union {
    uint64_t address;
    struct {
        uint64_t pageOffset : 12;     // Bits 0 - 11
        uint64_t ptIndex    : 9;      // Bits 12 - 20
        uint64_t pdIndex    : 9;      // Bits 21 - 29
        uint64_t pdpIndex   : 9;      // Bits 30 - 38
        uint64_t pml4Index  : 9;      // Bits 39 - 47
        uint64_t signExtend : 16;     // Bits 48 - 63
    } fields;
} VirtualAddress;
The entry within each page table level corresponds to the physical base address of the next table. This process continues until we reach the final table, where the Page Frame Number (PFN) is retrieved. The PFN represents the physical page number.
By multiplying the PFN by the system’s PAGE_SIZE (usually 0x1000 bytes or 4KB), we can determine the physical address of the page. The system then appends the pageOffset value to get the actual physical address the virtual address points to.
For now, we will skip the PML5 table as this only exists when 5-Level paging is enabled.
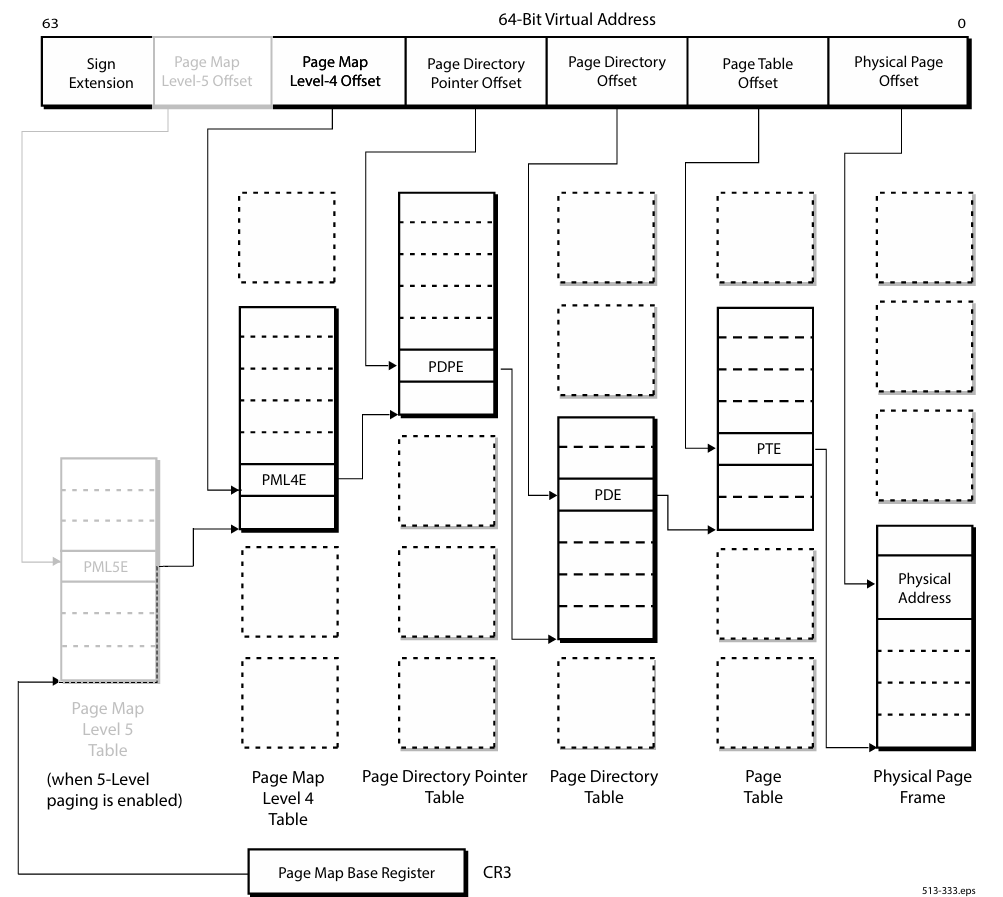
The process of translating a virtual address into a physical address follows a well-defined hierarchy, as seen in the above image. Each level in this hierarchy contains 512 entries.
struct PageMapLevel4 {
    ULONGLONG PageMapLevel4Entry[512];  // Each entry can contain a PDP address.
};

struct PageDirectoryPointer {
    ULONGLONG PageDirectoryPointerEntry[512];  // Each entry can contain a PD address.
};

struct PageDirectory {
    ULONGLONG PageDirectoryEntry[512];  // Each entry can contain a PT address.
};

struct PageTable {
    ULONGLONG PageTableEntry[512];  // Each entry can contain Page info.
};
Page Table Entries (PTEs)
When the hierarchical page tables have been navigated, we end up with a Page Table Entry (PTE). These QWORD sized entries contain information about the actual physical memory location that the current translation is mapped to. This includes the PFN as well as memory-related flags.
The PTE structure is as follows:
typedef struct {
    uint64_t Present        : 1;  // Bit 0
    uint64_t RW             : 1;  // Bit 1
    uint64_t US             : 1;  // Bit 2
    uint64_t PWT            : 1;  // Bit 3
    uint64_t PCD            : 1;  // Bit 4
    uint64_t Accessed       : 1;  // Bit 5
    uint64_t Dirty          : 1;  // Bit 6
    uint64_t PAT            : 1;  // Bit 7
    uint64_t Global         : 1;  // Bit 8
    uint64_t Available      : 3;  // Bits 9 - 11
    uint64_t PageFrameNumber: 40; // Bits 12 - 51
    uint64_t Reserved       : 11; // Bits 52 - 62
    uint64_t NX             : 1;  // Bit 63
} PTE;
If we take 8100000139EAC025 as an example PTE, we can visualize the PTE structure bits:

With the example value used above, we can simply print out the different fields within the PTE.
#include <iostream>
#include <Windows.h>

typedef union {
    uint64_t address;
    struct {
        uint64_t Present : 1;          // Bit 0
        uint64_t RW : 1;               // Bit 1
        uint64_t US : 1;               // Bit 2
        uint64_t PWT : 1;              // Bit 3
        uint64_t PCD : 1;              // Bit 4
        uint64_t Accessed : 1;         // Bit 5
        uint64_t Dirty : 1;            // Bit 6
        uint64_t PAT : 1;              // Bit 7
        uint64_t Global : 1;           // Bit 8
        uint64_t Available : 3;        // Bits 9 - 11
        uint64_t PageFrameNumber : 40; // Bits 12 - 51
        uint64_t Reserved : 11;        // Bits 52 - 62
        uint64_t NX : 1;               // Bit 63
    } fields;
} PTE;

int main() {
    PTE pte;
    pte.address = 0x8100000139EAC025;

    printf("PTE Full Address: 0x%llx\n\n", pte.address);

    printf("PTE Fields:\n");
    printf("Present: %llu\n", pte.fields.Present);
    printf("Read/Write (RW): %llu\n", pte.fields.RW);
    printf("User/Supervisor (US): %llu\n", pte.fields.US);
    printf("Page Write-Through (PWT): %llu\n", pte.fields.PWT);
    printf("Page Cache Disable (PCD): %llu\n", pte.fields.PCD);
    printf("Accessed: %llu\n", pte.fields.Accessed);
    printf("Dirty: %llu\n", pte.fields.Dirty);
    printf("Page Attribute Table (PAT): %llu\n", pte.fields.PAT);
    printf("Global: %llu\n", pte.fields.Global);
    printf("Available: %llu\n", pte.fields.Available);
    printf("Page Frame Number (PFN): 0x%llx\n", pte.fields.PageFrameNumber);
    printf("Reserved: %llu\n", pte.fields.Reserved);
    printf("No Execute (NX): %llu\n", pte.fields.NX);

    return 0;
}
PTE Full Address: 0x8100000139eac025

PTE Fields:
Present: 1
Read/Write (RW): 0
User/Supervisor (US): 1
Page Write-Through (PWT): 0
Page Cache Disable (PCD): 0
Accessed: 1
Dirty: 0
Page Attribute Table (PAT): 0
Global: 0
Available: 0
Page Frame Number (PFN): 0x139eac
Reserved: 16
No Execute (NX): 1
By gaining control over PTE contents, attackers can modify memory permissions, alter memory origins, and completely remap memory regions.
CR3 Register
In the AMD64 architecture, virtual addresses can map to different physical memory locations depending on the context in which they are used. This “context” refers to the virtual memory environment of a specific process. For example, a virtual address in Context A (the address space of process A) may point to one physical memory region, while the same virtual address in Context B (the address space of process B) points to an entirely different physical memory region.
The mechanism that enables this separation is the Page Map Base Register, stored in the CR3 register. The CR3 register holds the base address of the PML4 table, which is the highest-level page-translation table in the hierarchy. Whenever the OS decides to switch between process contexts, the CR3 register is updated to point to the PML4 table of that process.
Self-Reference Entries
In the AMD64 architecture, the self-reference entry is a mechanism that allows a page table to map to itself. This means that the page table can be accessed from within the address space it manages. Basically, a process can use a self-reference entry to view and modify its own page table hierarchy directly. We can see how the PTE self-reference entry within the PML4 table actually points to the base of the PML4 table, instead of a PDP table.
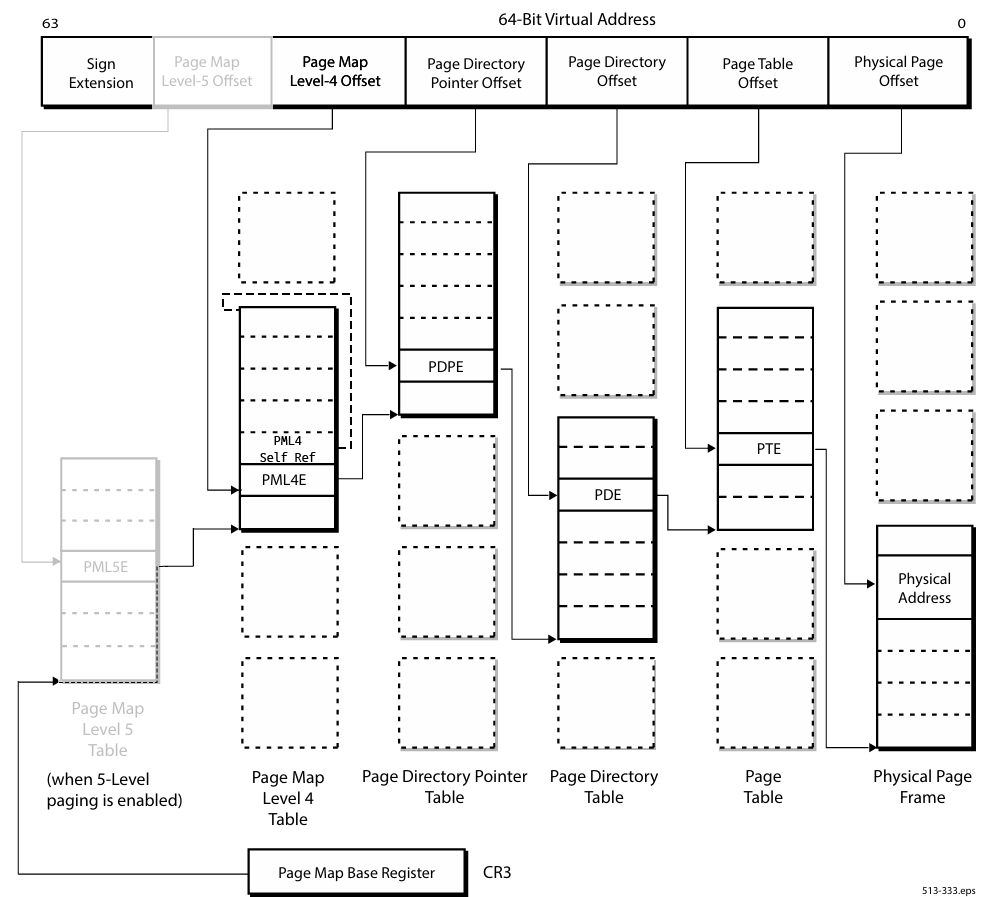
With this mechanism, the OS can bypass the final table lookup, enabling direct access to the PTE from virtual memory. Previously, both the PTE and PDE self-reference entries were mapped at static virtual addresses. However, for security reasons, these addresses are now randomized to prevent attacks targeting the static mappings. Despite this randomization, the OS still relies on these self-reference entries, making them relatively easy to locate using a read primitive.
We can see how the OS retrieves these addresses using the nt!MiGetPTEAddress and nt!MiGetPDEAddress functions.
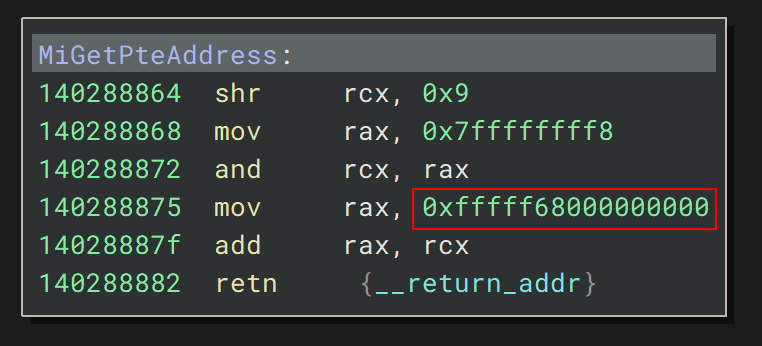
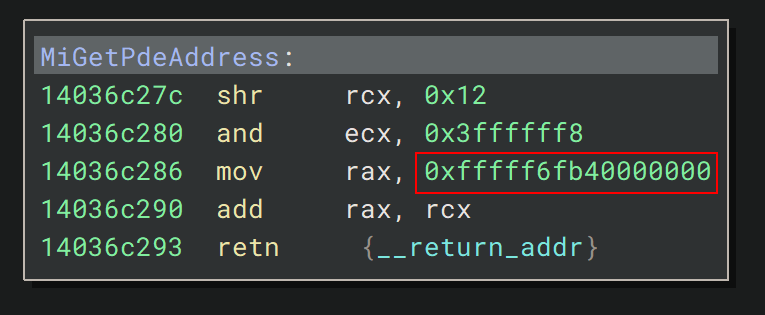
In order to retrieve these values using a read primitive, we simply read the QWORDs located at nt!MiGetPTEAddress + 0x13 and nt!MiGetPDEAddress + 0x0c.
1: kd> dq nt!MiGetPdeAddress + 0Xc L1
fffff806`356c794c  ffff8944`80000000

1: kd> dq nt!MiGetPteAddress + 0X13 L1
fffff806`3568f66f  ffff8900`00000000
Using these self-reference entries, we can directly access PTEs and PDEs from virtual memory. If we for example want to access the PTE for address 00007ff776890000, we right-shift the address by 9 (in order to account for the skipped table lookup), and add the PTE self-reference base.
1: kd> dq nt!MiGetPteAddress + 0X13 L1
fffff806`3568f66f  ffff8900`00000000

1: kd> ? ffff890000000000 + (00007ff776890000 >> 0n9)
Evaluate expression: -130567077411712 = ffff893f`fbbb4480

1: kd> dqs ffff893ffbbb4480 L1
ffff893f`fbbb4480  81000001`39eac025
We can see this matches the !pte result in WinDBG.
1: kd> !pte 00007ff776890000
                                           VA 00007ff776890000
PXE at FFFF8944A25127F8    PPE at FFFF8944A24FFEE8    PDE at FFFF89449FFDDDA0    PTE at FFFF893FFBBB4480
contains 0A000001393C5867  contains 0A000001393C6867  contains 0A000001393C7867  contains 8100000139EAC025
pfn 1393c5    ---DA--UWEV  pfn 1393c6    ---DA--UWEV  pfn 1393c7    ---DA--UWEV  pfn 139eac    ----A--UR-V
Example Time
Now that we’ve covered the theory, let’s put it into practice by manually translating a virtual address into its corresponding physical memory location. We will be using the MsMpEng.exe base for our example.
Step 1: Locate the process and switch context
First, we need to find the MsMpEng.exe process to switch WinDBG to the correct process context. This will allow us to retrieve its virtual base address and begin translating the address.
1: kd> !process 0 0 MsMpEng.exe
Unable to reset the USB hub where the USB node failed enumeration
PROCESS ffff8e82692b9080
    SessionId: 0  Cid: 1020    Peb: 29c5139000  ParentCid: 0380
    DirBase: 12defc000  ObjectTable: ffffc70f8dcf2800  HandleCount: 1055.
    Image: MsMpEng.exe
Looking at the !process output, we can see the DirBase value. This value corresponds to the KPROCESS.DirectoryTableBase value, which is the value that the CR3 register is set to upon a process context change.
We then switch to this process context:
1: kd> .process /i ffff8e82692b9080
You need to continue execution (press 'g' <enter>) for the context
to be switched. When the debugger breaks in again, you will be in
the new process context.

1: kd> g
Break instruction exception - code 80000003 (first chance)
nt!DbgBreakPointWithStatus:
fffff806`35824620 cc              int     3
After switching, we reload the user symbols to retrieve the virtual base address of MsMpEng.exe.
2: kd> .reload /user
Loading User Symbols
....................................................
....................................................

2: kd> ? MsMpEng
Evaluate expression: 140700111732736 = 00007ff7`4c2e0000
Step 2: Locate the PML4E
As mentioned, we can retrieve the PML4 table base from the CR3 register or through the KPROCESS.DirectoryTableBase field.
2: kd> dt ffff8e82692b9080 nt!_KPROCESS DirectoryTableBase
   +0x028 DirectoryTableBase : 0x00000001`2defc000
By following the page translation logic, we can retrieve the PML4 table index from the virtual address we are translating.
2: kd> ? MsMpEng >> 0n39 & 0x1FF
Evaluate expression: 255 = 00000000`000000ff
Next we can take the PML4 base and find the entry that corresponds to this index.
2: kd> !dq 0x000000012defc000 + (0xff * 8) L1
#12defc7f8 0a000001`2e108867
0a0000012e108867 is the PML4E of the address we are looking for, we can retrieve the PDP base by extracting the right bits.
2: kd> ? 0a0000012e108867 & 0000FFFFFFFFF000
Evaluate expression: 5067800576 = 00000001`2e108000
Step 3: Repeat for PDPE, PDE, and PTE
We now continue this process for the PDP, PD, and the PT until we get the PTE value.
Retrieving the PDPE & PD Base
2: kd> ? MsMpEng >> 0n30 & 0x1FF
Evaluate expression: 477 = 00000000`000001dd

2: kd> !dq 000000012e108000 + (0x1dd * 8) L1
#12e108ee8 0a000001`2e109867

2: kd> ? 0a0000012e109867& 0000FFFFFFFFF000
Evaluate expression: 5067804672 = 00000001`2e109000
Retrieving the PDE & PT Base
2: kd> ? MsMpEng >> 0n21 & 0x1FF
Evaluate expression: 97 = 00000000`00000061

2: kd> !dq 000000012e109000+ (61 * 8) L1
#12e109308 0a000001`29e0a867

2: kd> ? 0a00000129e0a867 & 0000FFFFFFFFF000
Evaluate expression: 4997554176 = 00000001`29e0a000
Retrieving the PTE
2: kd> ? MsMpEng >> 0n12 & 0x1FF
Evaluate expression: 224 = 00000000`000000e0

2: kd> !dq 0000000129e0a000 + (e0 * 8) L1
#129e0a700 81000001`20839025
We now retrieved the PTE that corresponds to the MsMpEng module base: 8100000120839025. In order to verify that we’ve found the correct physical address we can read the MZ header located at the start of the MsMpEng module.
2: kd> ? 8100000120839025 & 0000FFFFFFFFF000
Evaluate expression: 4840460288 = 00000001`20839000

2: kd> !db 00000001`20839000
#120839000 4d 5a 90 00 03 00 00 00-04 00 00 00 ff ff 00 00 MZ..............
#120839010 b8 00 00 00 00 00 00 00-40 00 00 00 00 00 00 00 ........@.......
#120839020 00 00 00 00 00 00 00 00-00 00 00 00 00 00 00 00 ................
#120839030 00 00 00 00 00 00 00 00-00 00 00 00 f8 00 00 00 ................
#120839040 0e 1f ba 0e 00 b4 09 cd-21 b8 01 4c cd 21 54 68 ........!..L.!Th
#120839050 69 73 20 70 72 6f 67 72-61 6d 20 63 61 6e 6e 6f is program canno
#120839060 74 20 62 65 20 72 75 6e-20 69 6e 20 44 4f 53 20 t be run in DOS
#120839070 6d 6f 64 65 2e 0d 0d 0a-24 00 00 00 00 00 00 00 mode....$.......
We can also verify the PTE with the !pte command in WinDBG.
2: kd> !pte MsMpEng
                                           VA 00007ff74c2e0000
PXE at FFFF8944A25127F8    PPE at FFFF8944A24FFEE8    PDE at FFFF89449FFDD308    PTE at FFFF893FFBA61700
contains 0A0000012E108867  contains 0A0000012E109867  contains 0A00000129E0A867  contains 8100000120839025
pfn 12e108    ---DA--UWEV  pfn 12e109    ---DA--UWEV  pfn 129e0a    ---DA--UWEV  pfn 120839    ----A--UR-V
Physical Primitive Exploitation
Now that we’ve covered the basics of page translation, we can dive into how we can leverage these mechanisms to achieve our goals on the target system. First, we’ll explore how to reliably convert physical Read/Write (RW) primitives into virtual RW primitives, and vice versa. Next, we’ll dive into techniques that allow us to create entirely new RW primitives. Finally, we’ll see how these RW primitives, combined with page translation, can be used to access and manipulate other process memory or inject code. all without needing process handles.
Physical to Virtual RW: Walking the tables
To transform our physical RW primitive into a virtual RW primitive, we need to translate the target virtual address into its corresponding physical address. As we covered in the page translation chapter, this process requires knowing the CR3 value (or PML4 base) of the target process. Without it, we cannot walk the page tables to find the PFN for the virtual address.
Luckily, the system CR3 value is always located at offset 0xa0 within one of the first pages. So scanning for this value is relatively trivial.
2: kd> !process 0 0 system
PROCESS ffff8e8263eb9040
    SessionId: none  Cid: 0004    Peb: 00000000  ParentCid: 0000
    DirBase: 001ae000  ObjectTable: ffffc70f8861d340  HandleCount: 3989.
    Image: System


2: kd> !search 001ae000 4 0 100
Using a machine size of 1ffe56 pages to configure the kd cache
Searching PFNs in range 0000000000000002 - 0000000000000100 for [00000000001ADFFC - 00000000001AE004]

Pfn              Offset   Hit              Va               Pte
- - - - - - - - - - - - - - - - - - - - - - - - - - - - - - - - - - - - - - - - - - - - - - - - -
0000000000000013 000000A0 00000000001AE000 FFFFF7FD4000D0A0 FFFF897BFEA00068
Search done.

2: kd> !dq 130a0 L1
#   130a0 00000000`001ae000
With the system CR3 value, we can now effectively walk the page tables and read/write to any virtual address that is valid in the system process context. This includes access to kernel memory, allowing us to retrieve the CR3 value of any process, including our current one, by checking the KPROCESS.DirectoryTableBase value:
2: kd> !process -1 0
PROCESS ffff8e82692b9080
    SessionId: 0  Cid: 1020    Peb: 29c5139000  ParentCid: 0380
    DirBase: 12defc000  ObjectTable: ffffc70f8dcf2800  HandleCount: 1055.
    Image: MsMpEng.exe

2: kd> dt ffff8e82692b9080 nt!_KPROCESS DirectoryTableBase
   +0x028 DirectoryTableBase : 0x00000001`2defc000
Now, we have the ability to translate any virtual address in the current process context into its corresponding physical page, allowing us to read and write to virtual memory using our physical RW primitive.
Virtual to Physical RW: Abusing PFNs
Now that we’re able to transform a physical RW into a virtual RW, lets flip it around. We can use a virtual RW primitive to create a physical RW primitive by leveraging the PFNs within PTEs. Remember, we can access PTEs through the PTE self-reference entry and by changing the PFN of a buffer we control, we can read/write to any physical page we want.
Creating New RW Primitives
Sometimes, the primitives you’ve created are somewhat limited in terms of execution time or constraints on access. However, by leveraging the page translation mechanism, you can use a restrictive RW primitive to create a more flexible and stable one.
We begin by writing the PT base address (retrieved from the PDE) of buffer 1 into the PFN of buffer 2. This operation redirects buffer 2 to point to buffer 1’s PT, allowing us to modify buffer 1’s PTE indirectly. By writing to buffer 2, we can now change the PFN and memory privileges of buffer 1, effectively allowing us to write to any physical address simply by writing to our own allocated buffers.
Consider the following memory layout containing 2 of our allocated buffers.
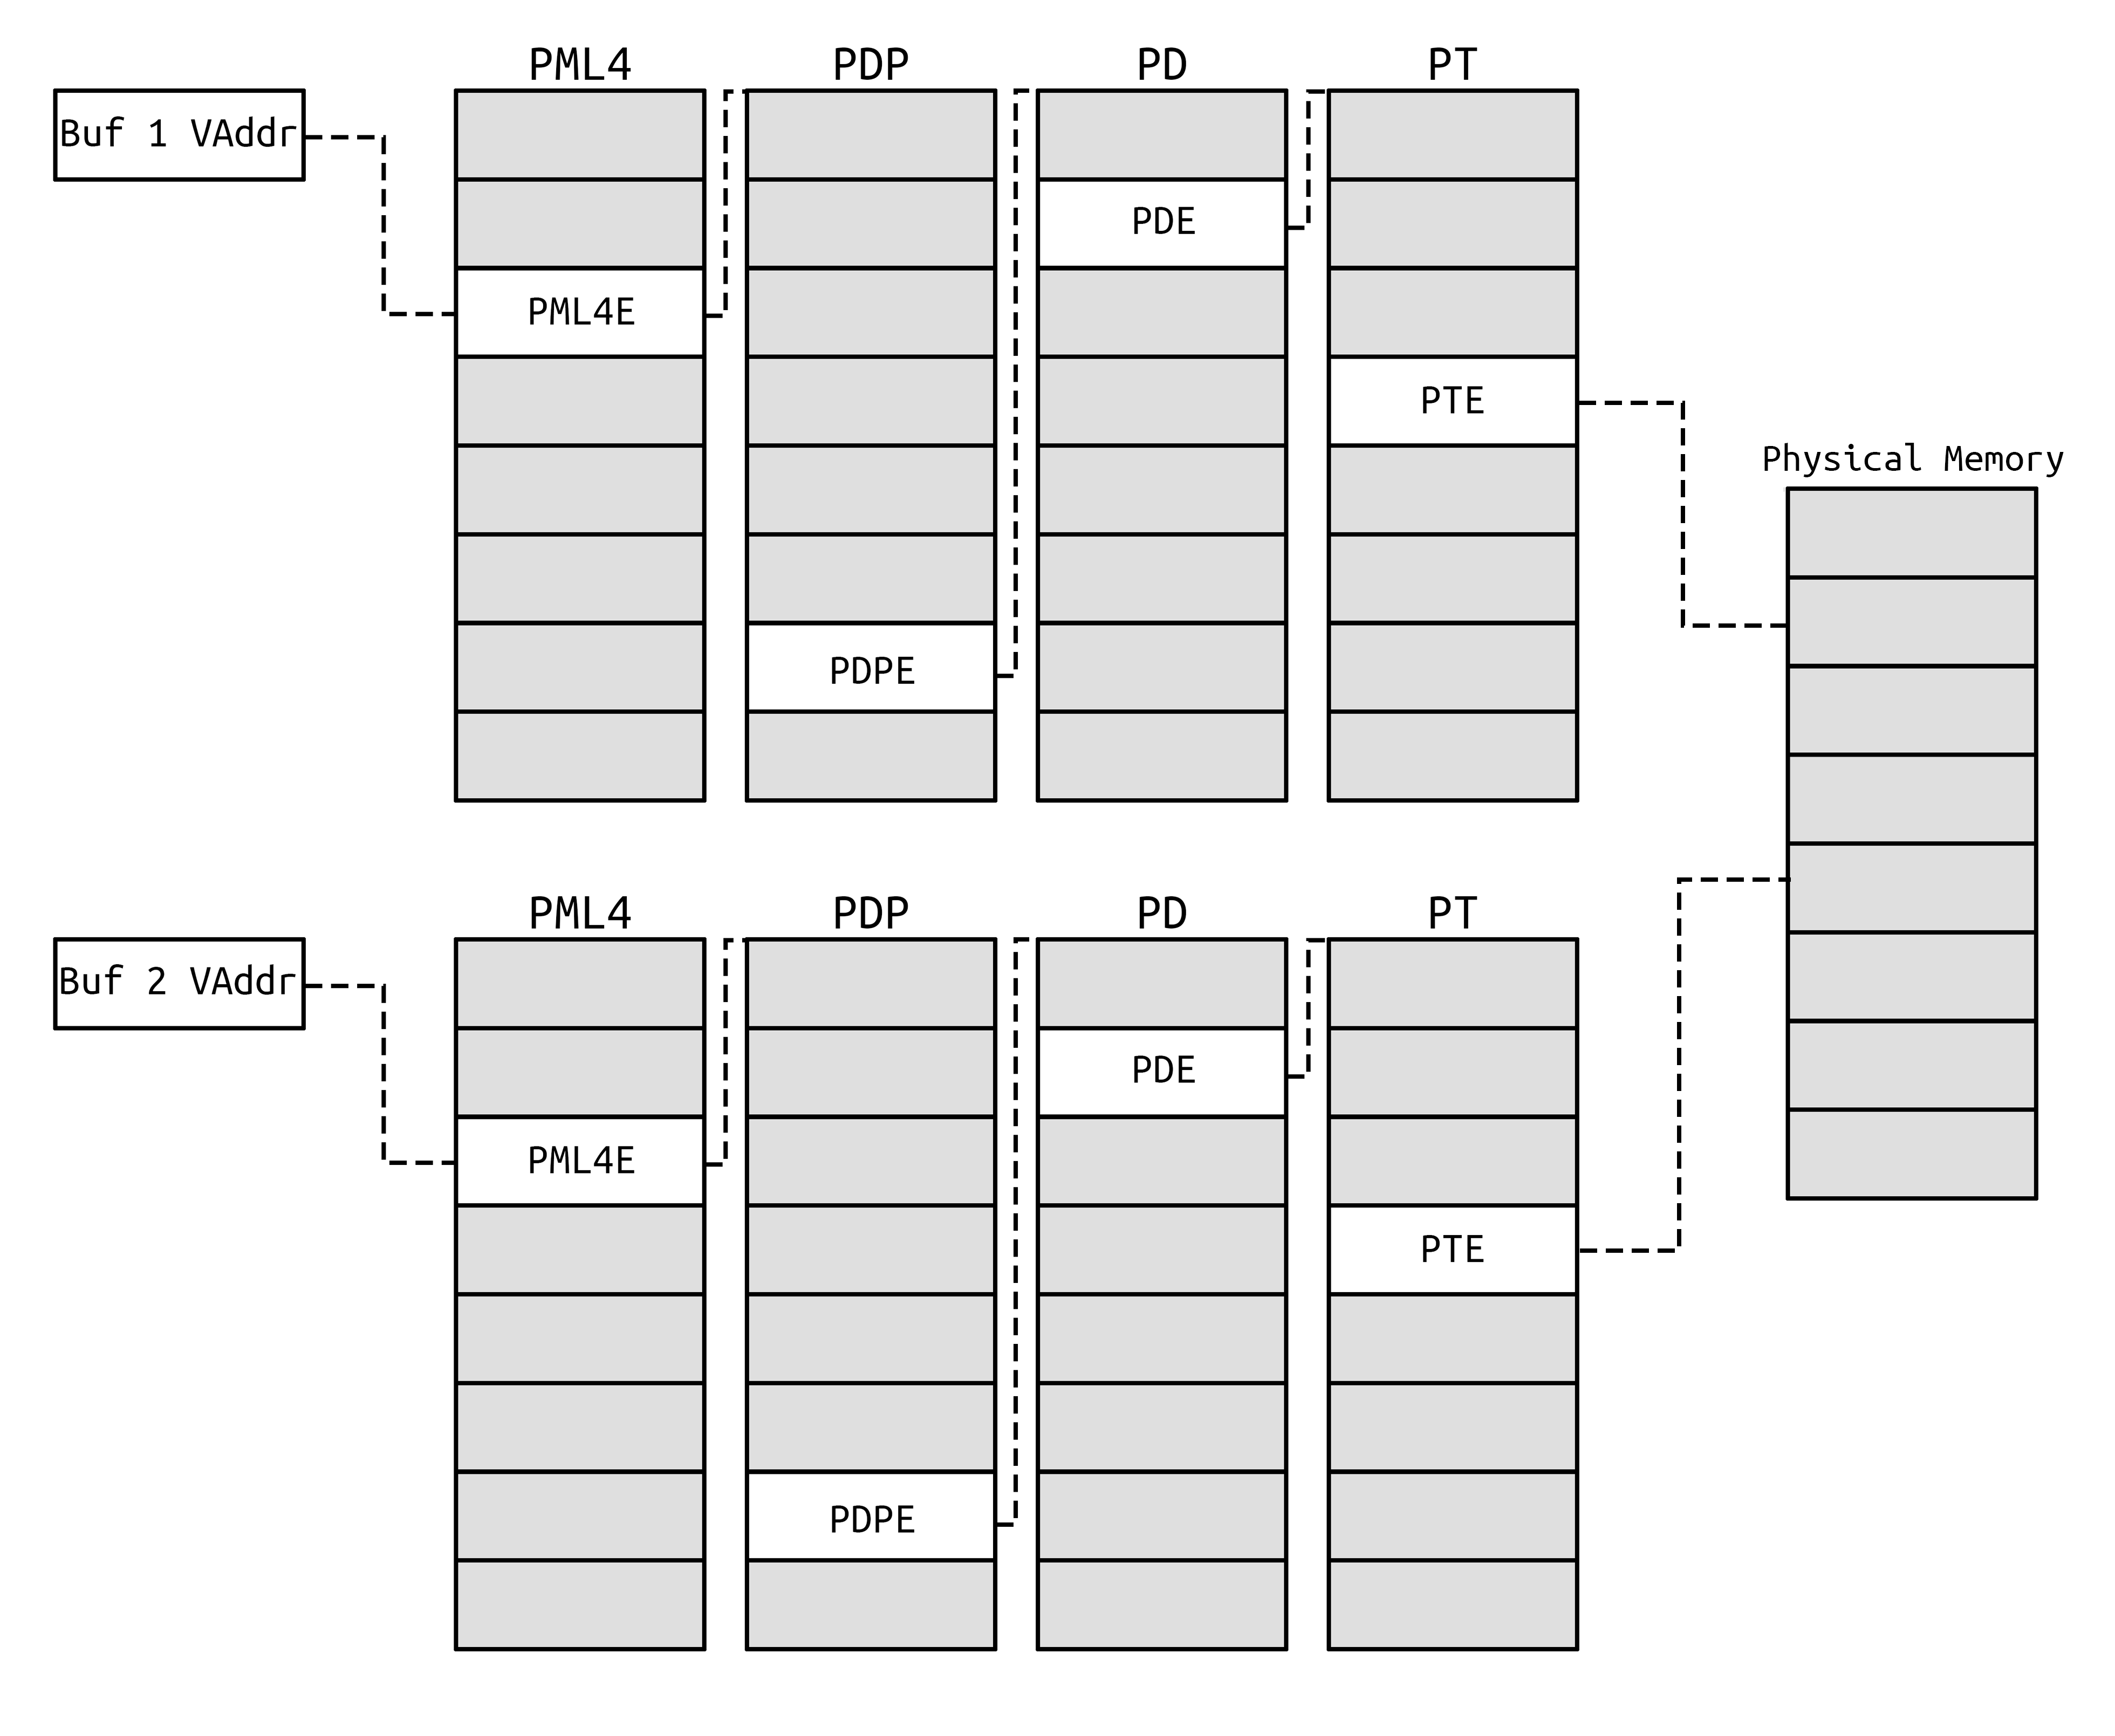
By writing the PT base of buffer 1 into the PFN of buffer 2, we can access the PT from buffer 2, including the PTE.
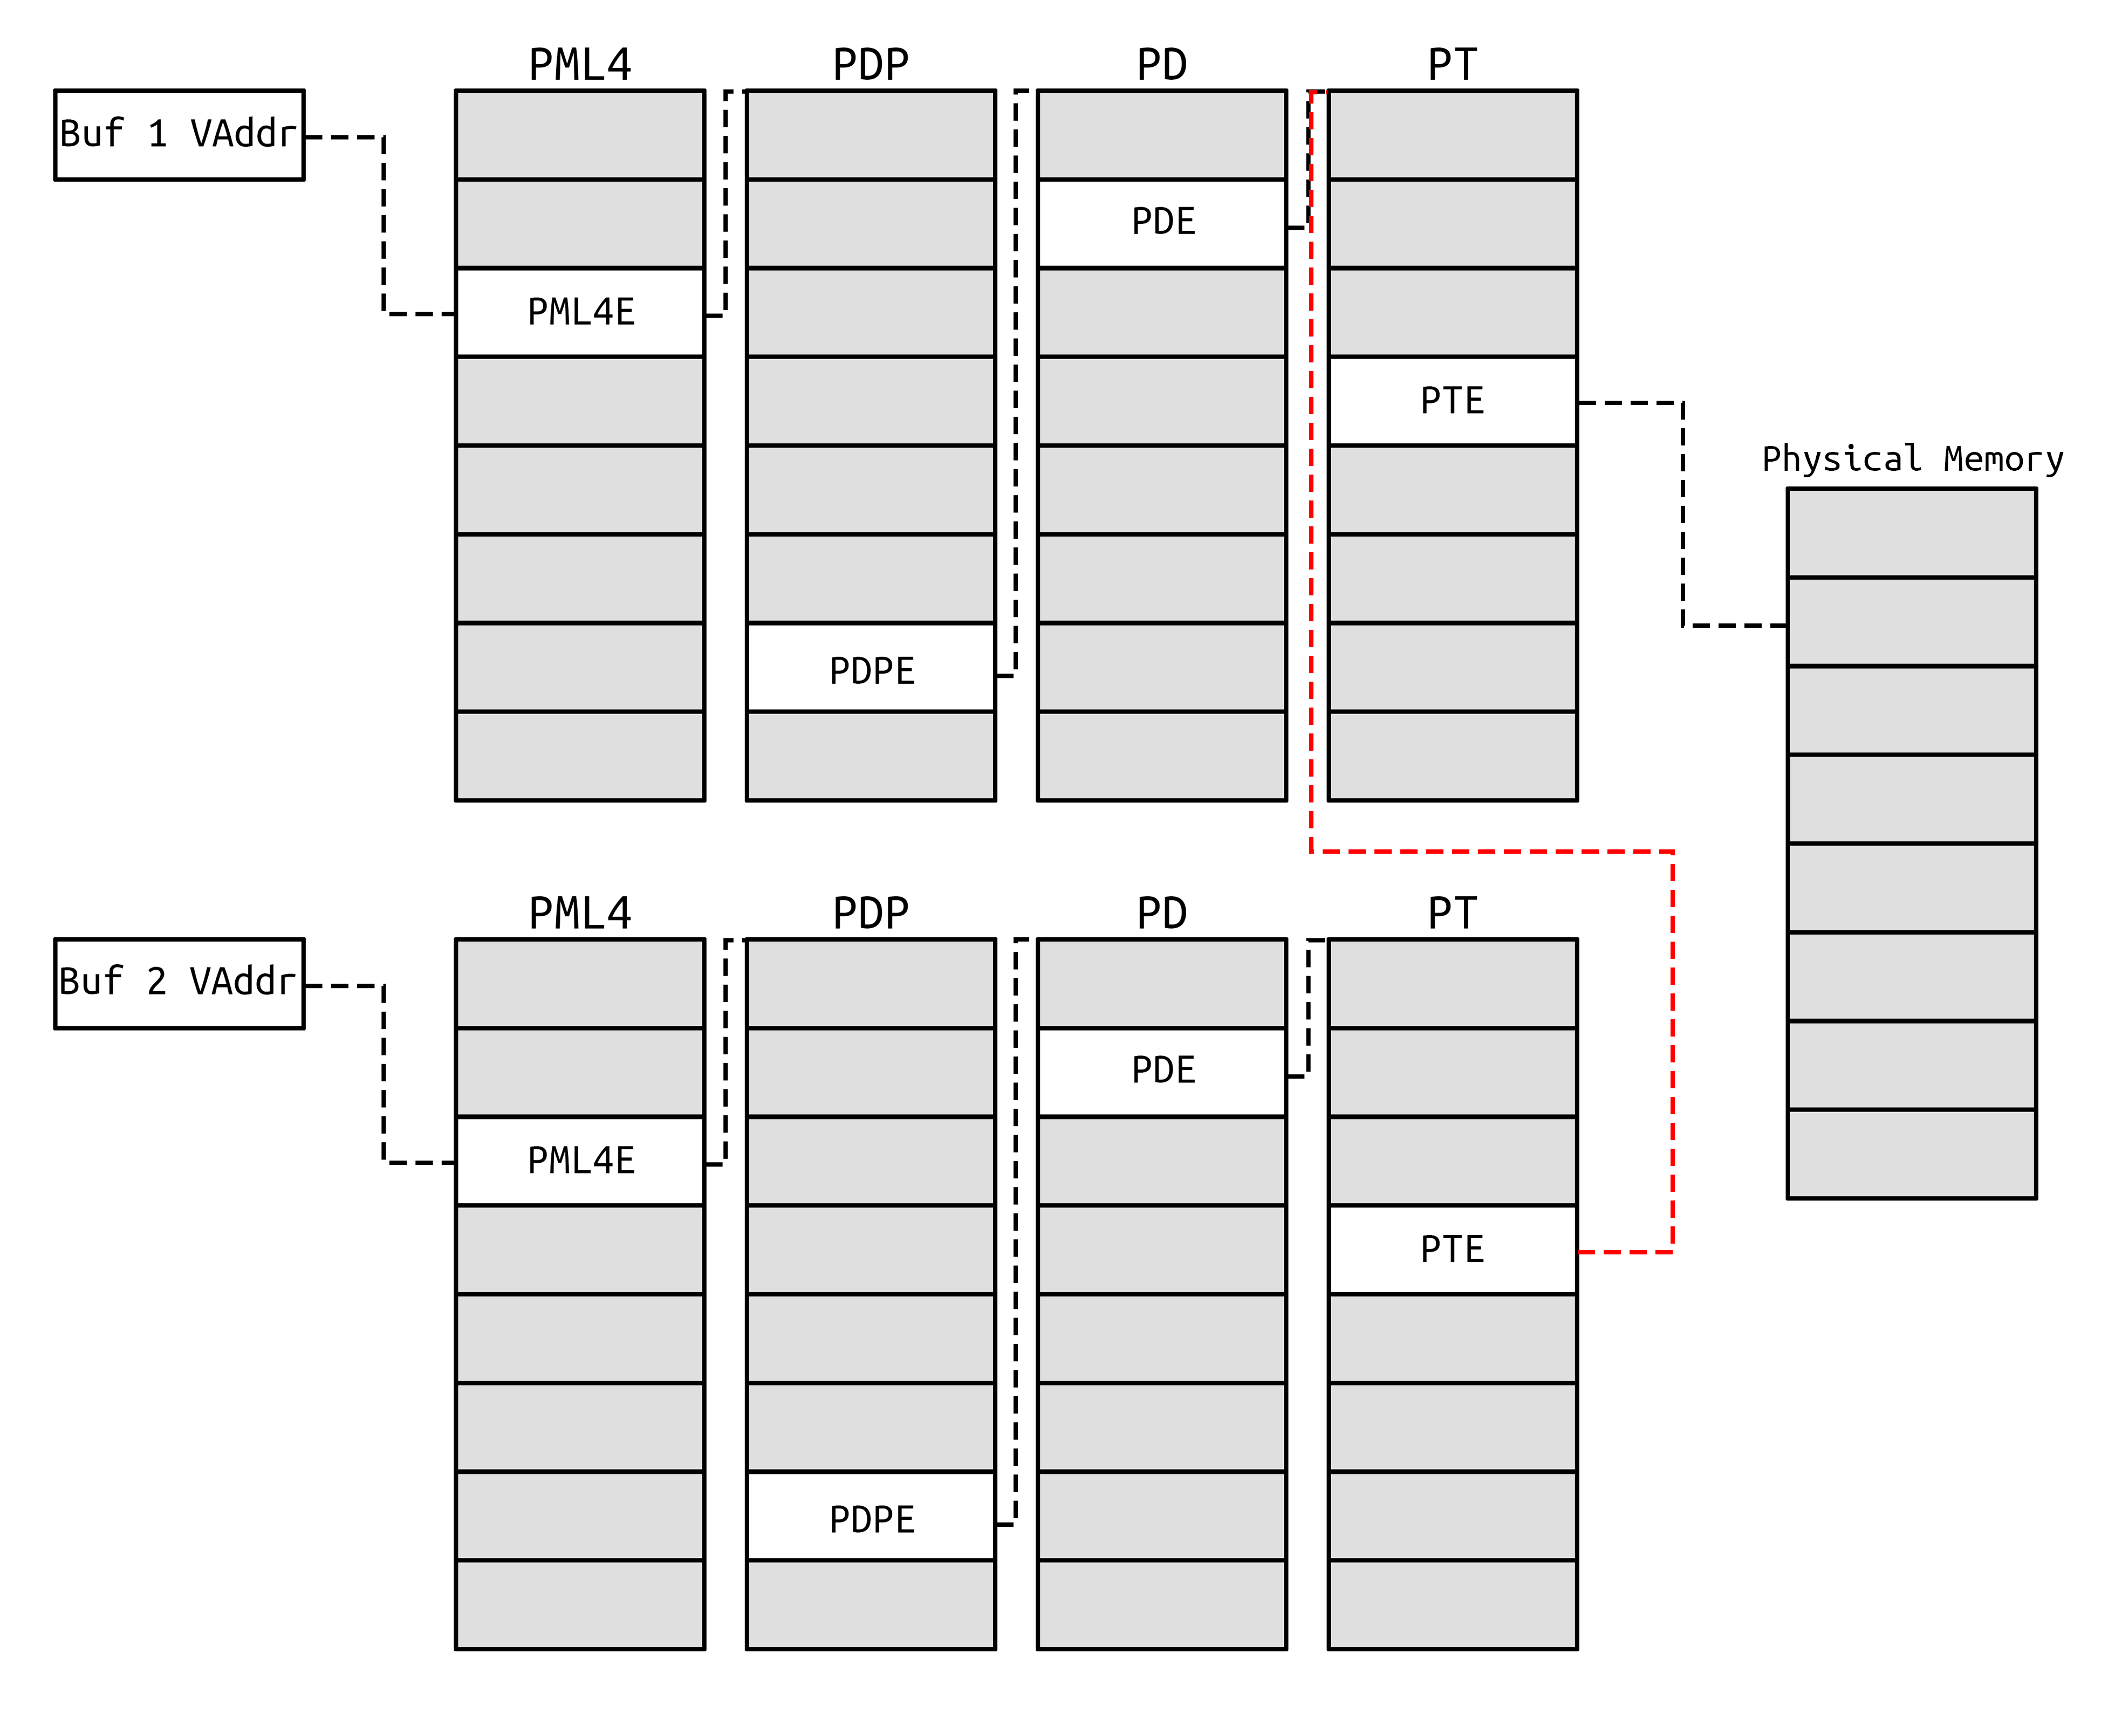
We can now change the PFN of buffer 1 and use the buffer in order to manipulate the target memory.
Dealing with the TLB
When manually altering page translations, we will encounter the CPU memory caching mechanism called the Translation Lookaside Buffer (TLB). This mechanism basically acts as address-translation cache. Caching the last few address translations for optimization. The issue is that if we manually change the PFN of a buffer, as with our custom RW primitive, the old translation may still be cached in the TLB. This causes any translation to translate to the old physical address, instead of our altered one.
Although a more reliable method in terms of execution time should be possible (flushing out the entries the TLB can hold). A simply and effective method to bypass this issue is to force a context switch.
void TLBFlush() {
	while (!SwitchToThread()) {
		continue;
	}
}
Case Study 1 - Stealthy Code Injection via Physical RW
In this case study, we’ll look at how our physical primitives can be leveraged in order to hook shared libraries, a well-known technique for hijacking the execution flow of a target process. By manipulating physical memory, we can stealthily inject code and alter the behavior of critical libraries without relying on typical user-mode or kernel-mode injection techniques.
One technique is to hook a function within ntdll.dll that is widely used by your target process. By applying a Process ID (PID) check within our hook logic, we can make sure that the actual hook logic is only executed by our target process.
The location we store our hook logic can vary, but one method could be to abuse code-alignment padding found between ntdll.dll functions to store our code. By dynamically scanning for these unused code regions, we can identify and chain together free space to store our hook code.
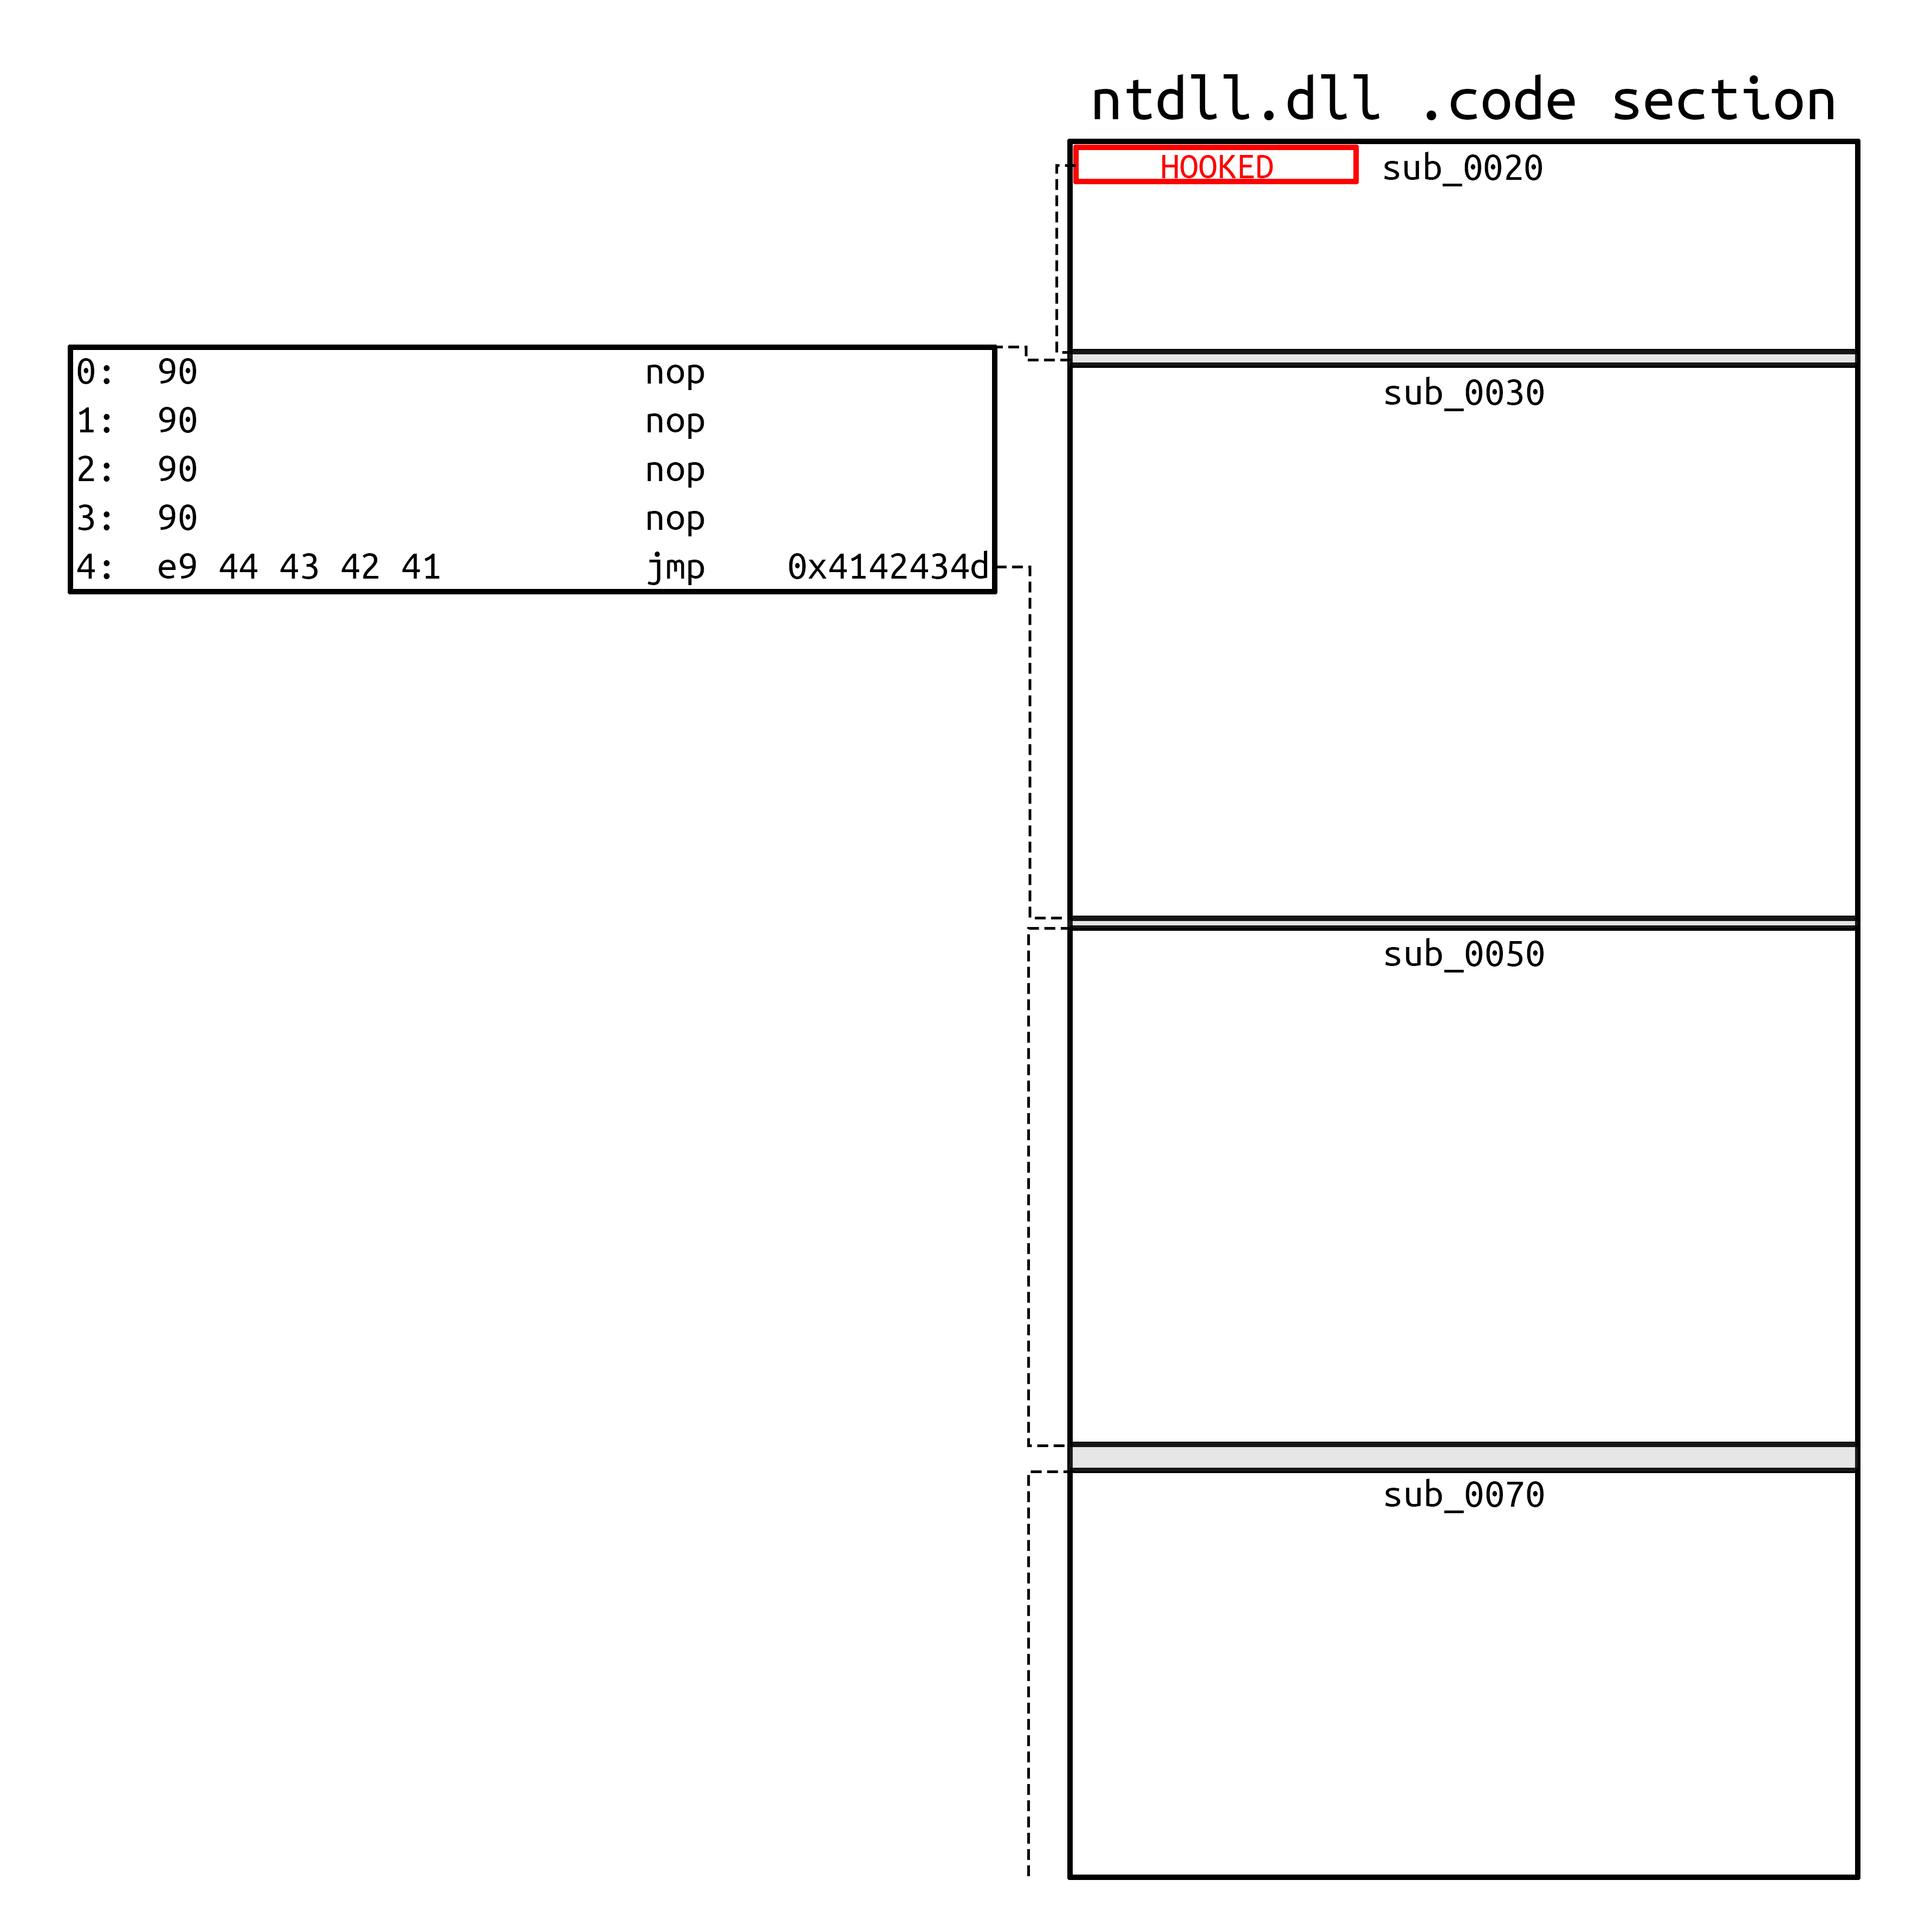
This technique enables us to inject code, even into highly monitored processes, bypassing traditional detection methods.

With the introduction of Virtualization-based Security (VBS), this method no longer works. The technique relies on manipulating physical memory that is now enforced as read-only. Due to the extra translation layer (Second Level Address Translation (SLAT), this read-only state is now enforced at the hypervisor level. In the next case study we will look at a technique that is still VBS compliant.
Case Study 2 - Manual Memory Mapping
In this case study, we will look at a technique that enables us to map the memory of a target process directly into the memory space of the current process. Since we already have full control over the paging structures, nothing prevents us from creating valid PTEs in the current process context that point to the target process’s memory.
Consider the following memory layout, where two different processes each have an allocated buffer within their memory space.
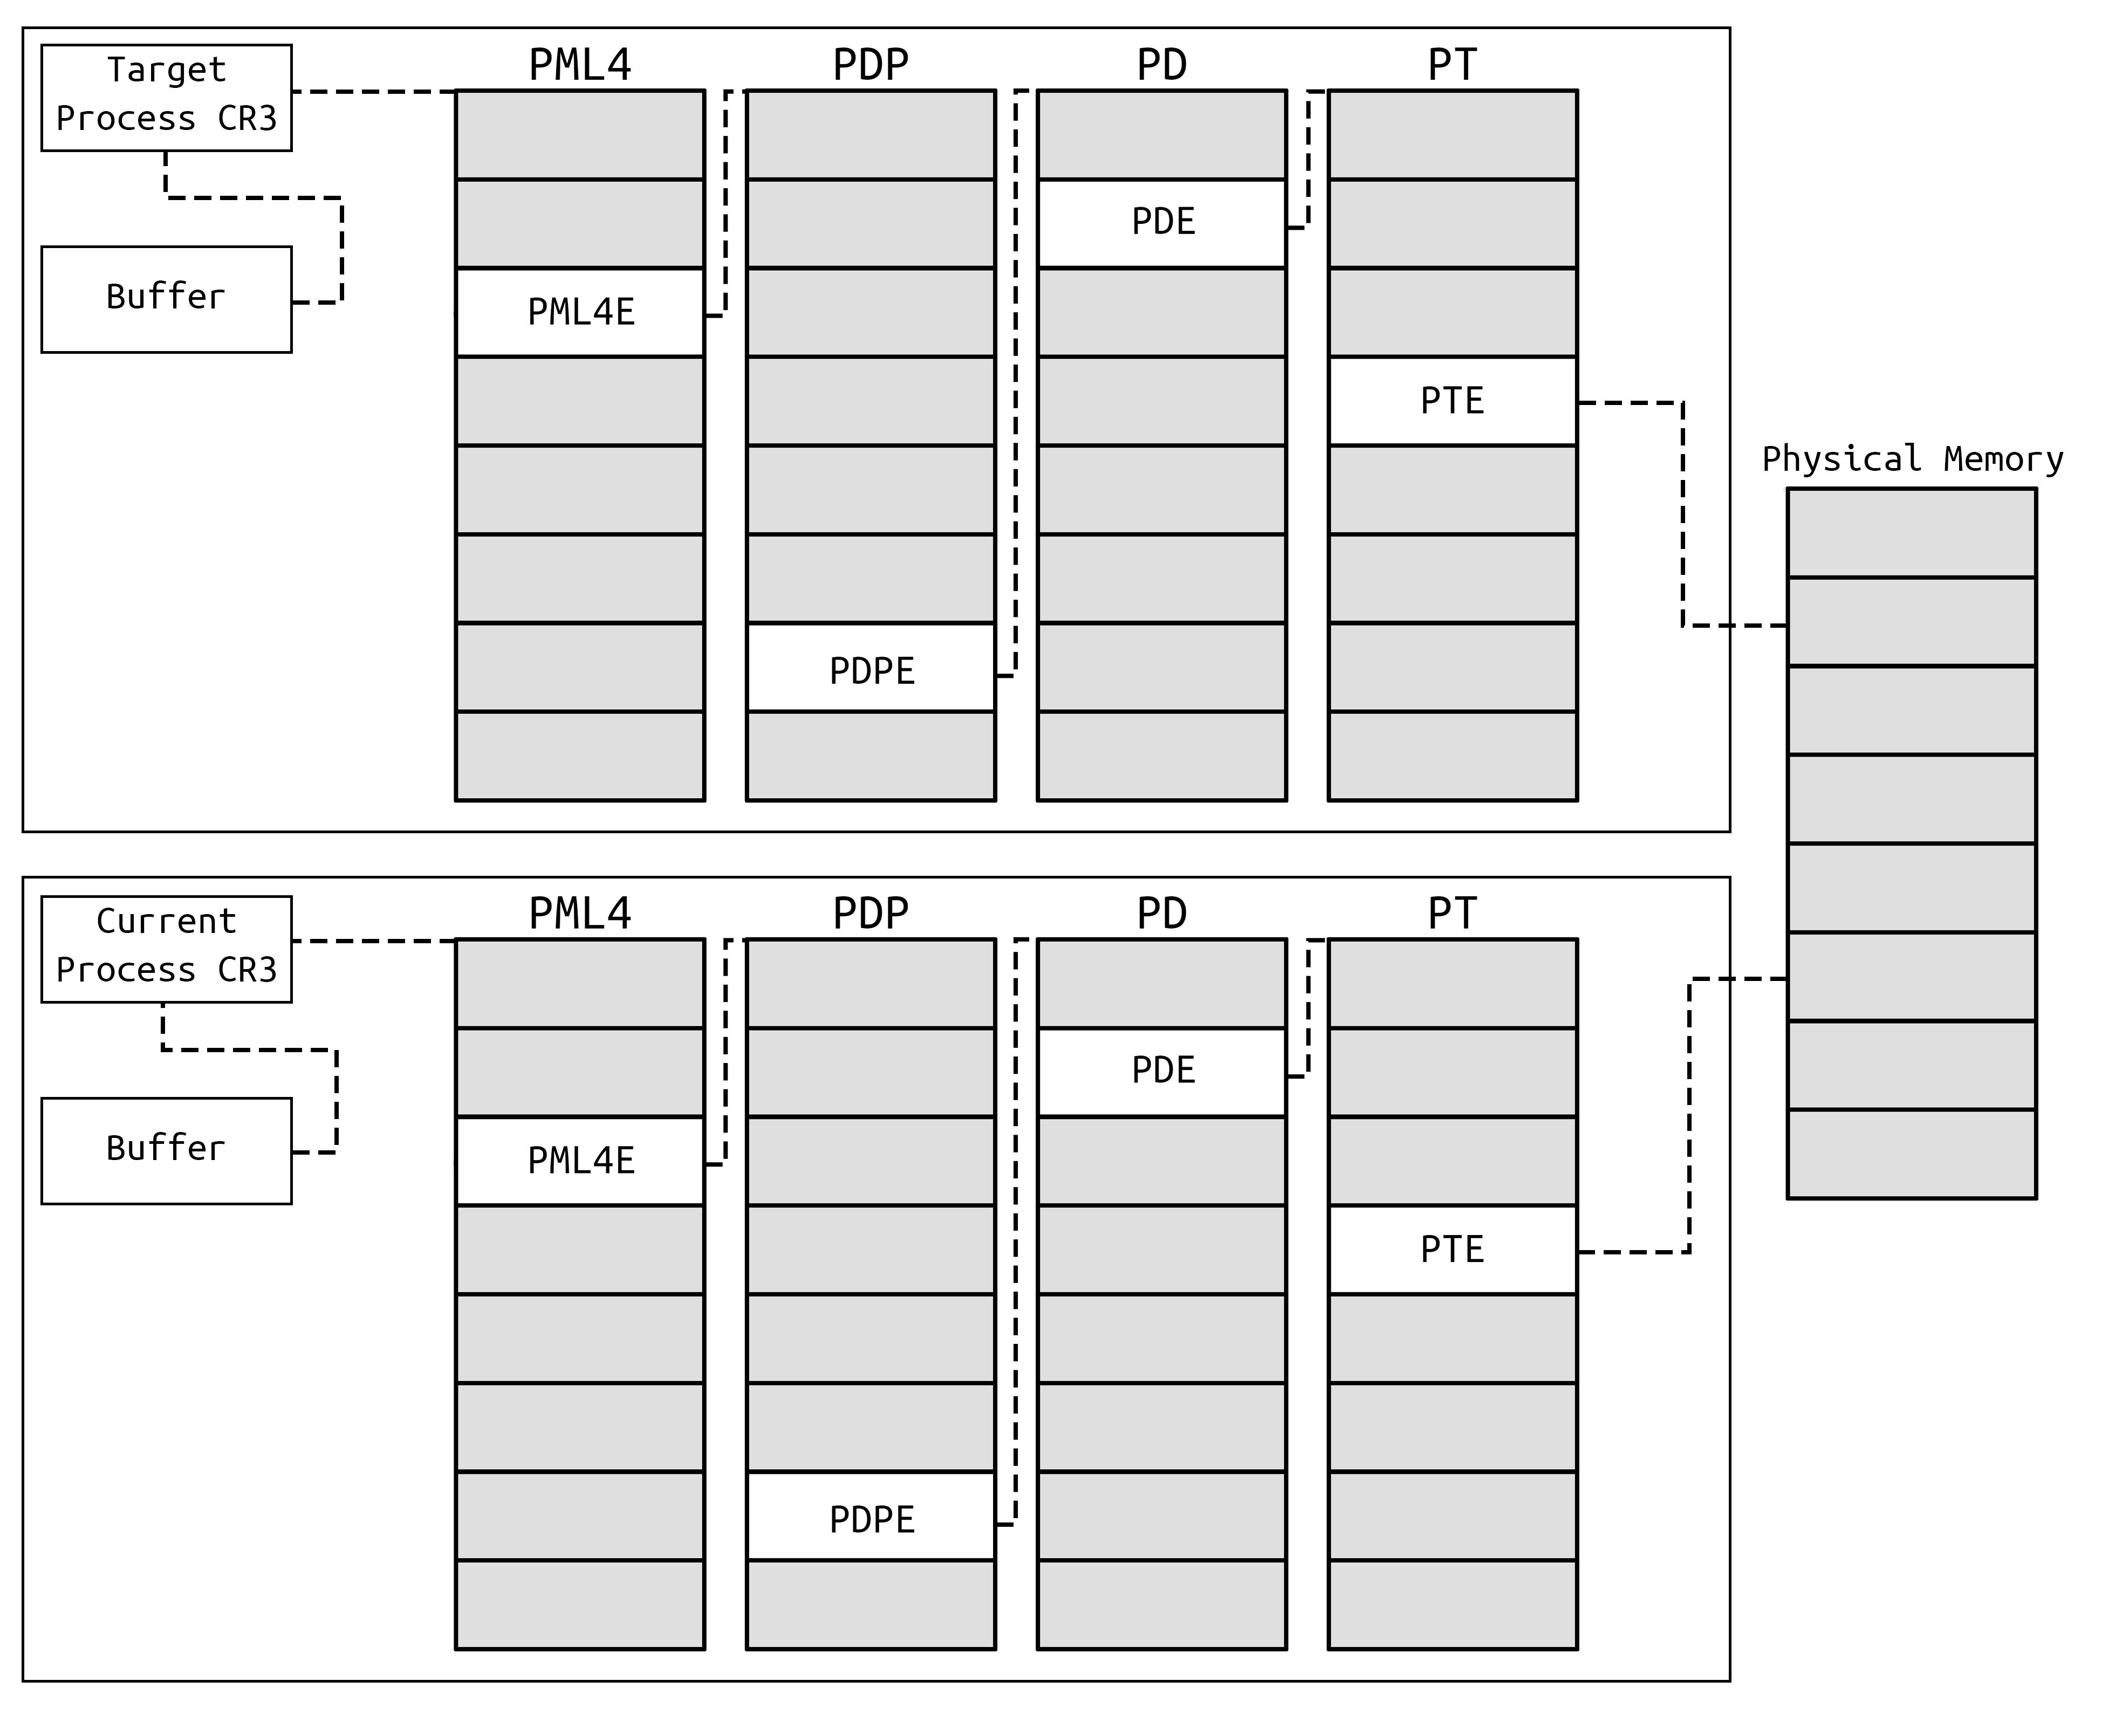
By obtaining the CR3 value of the target process (which can always be found by scanning physical memory), we can use our physical RW primitives to walk the target’s page tables and read the PFNs corresponding to the target memory. We then simply write these PFNs into our own page tables, effectively mapping the target memory into the current process context.
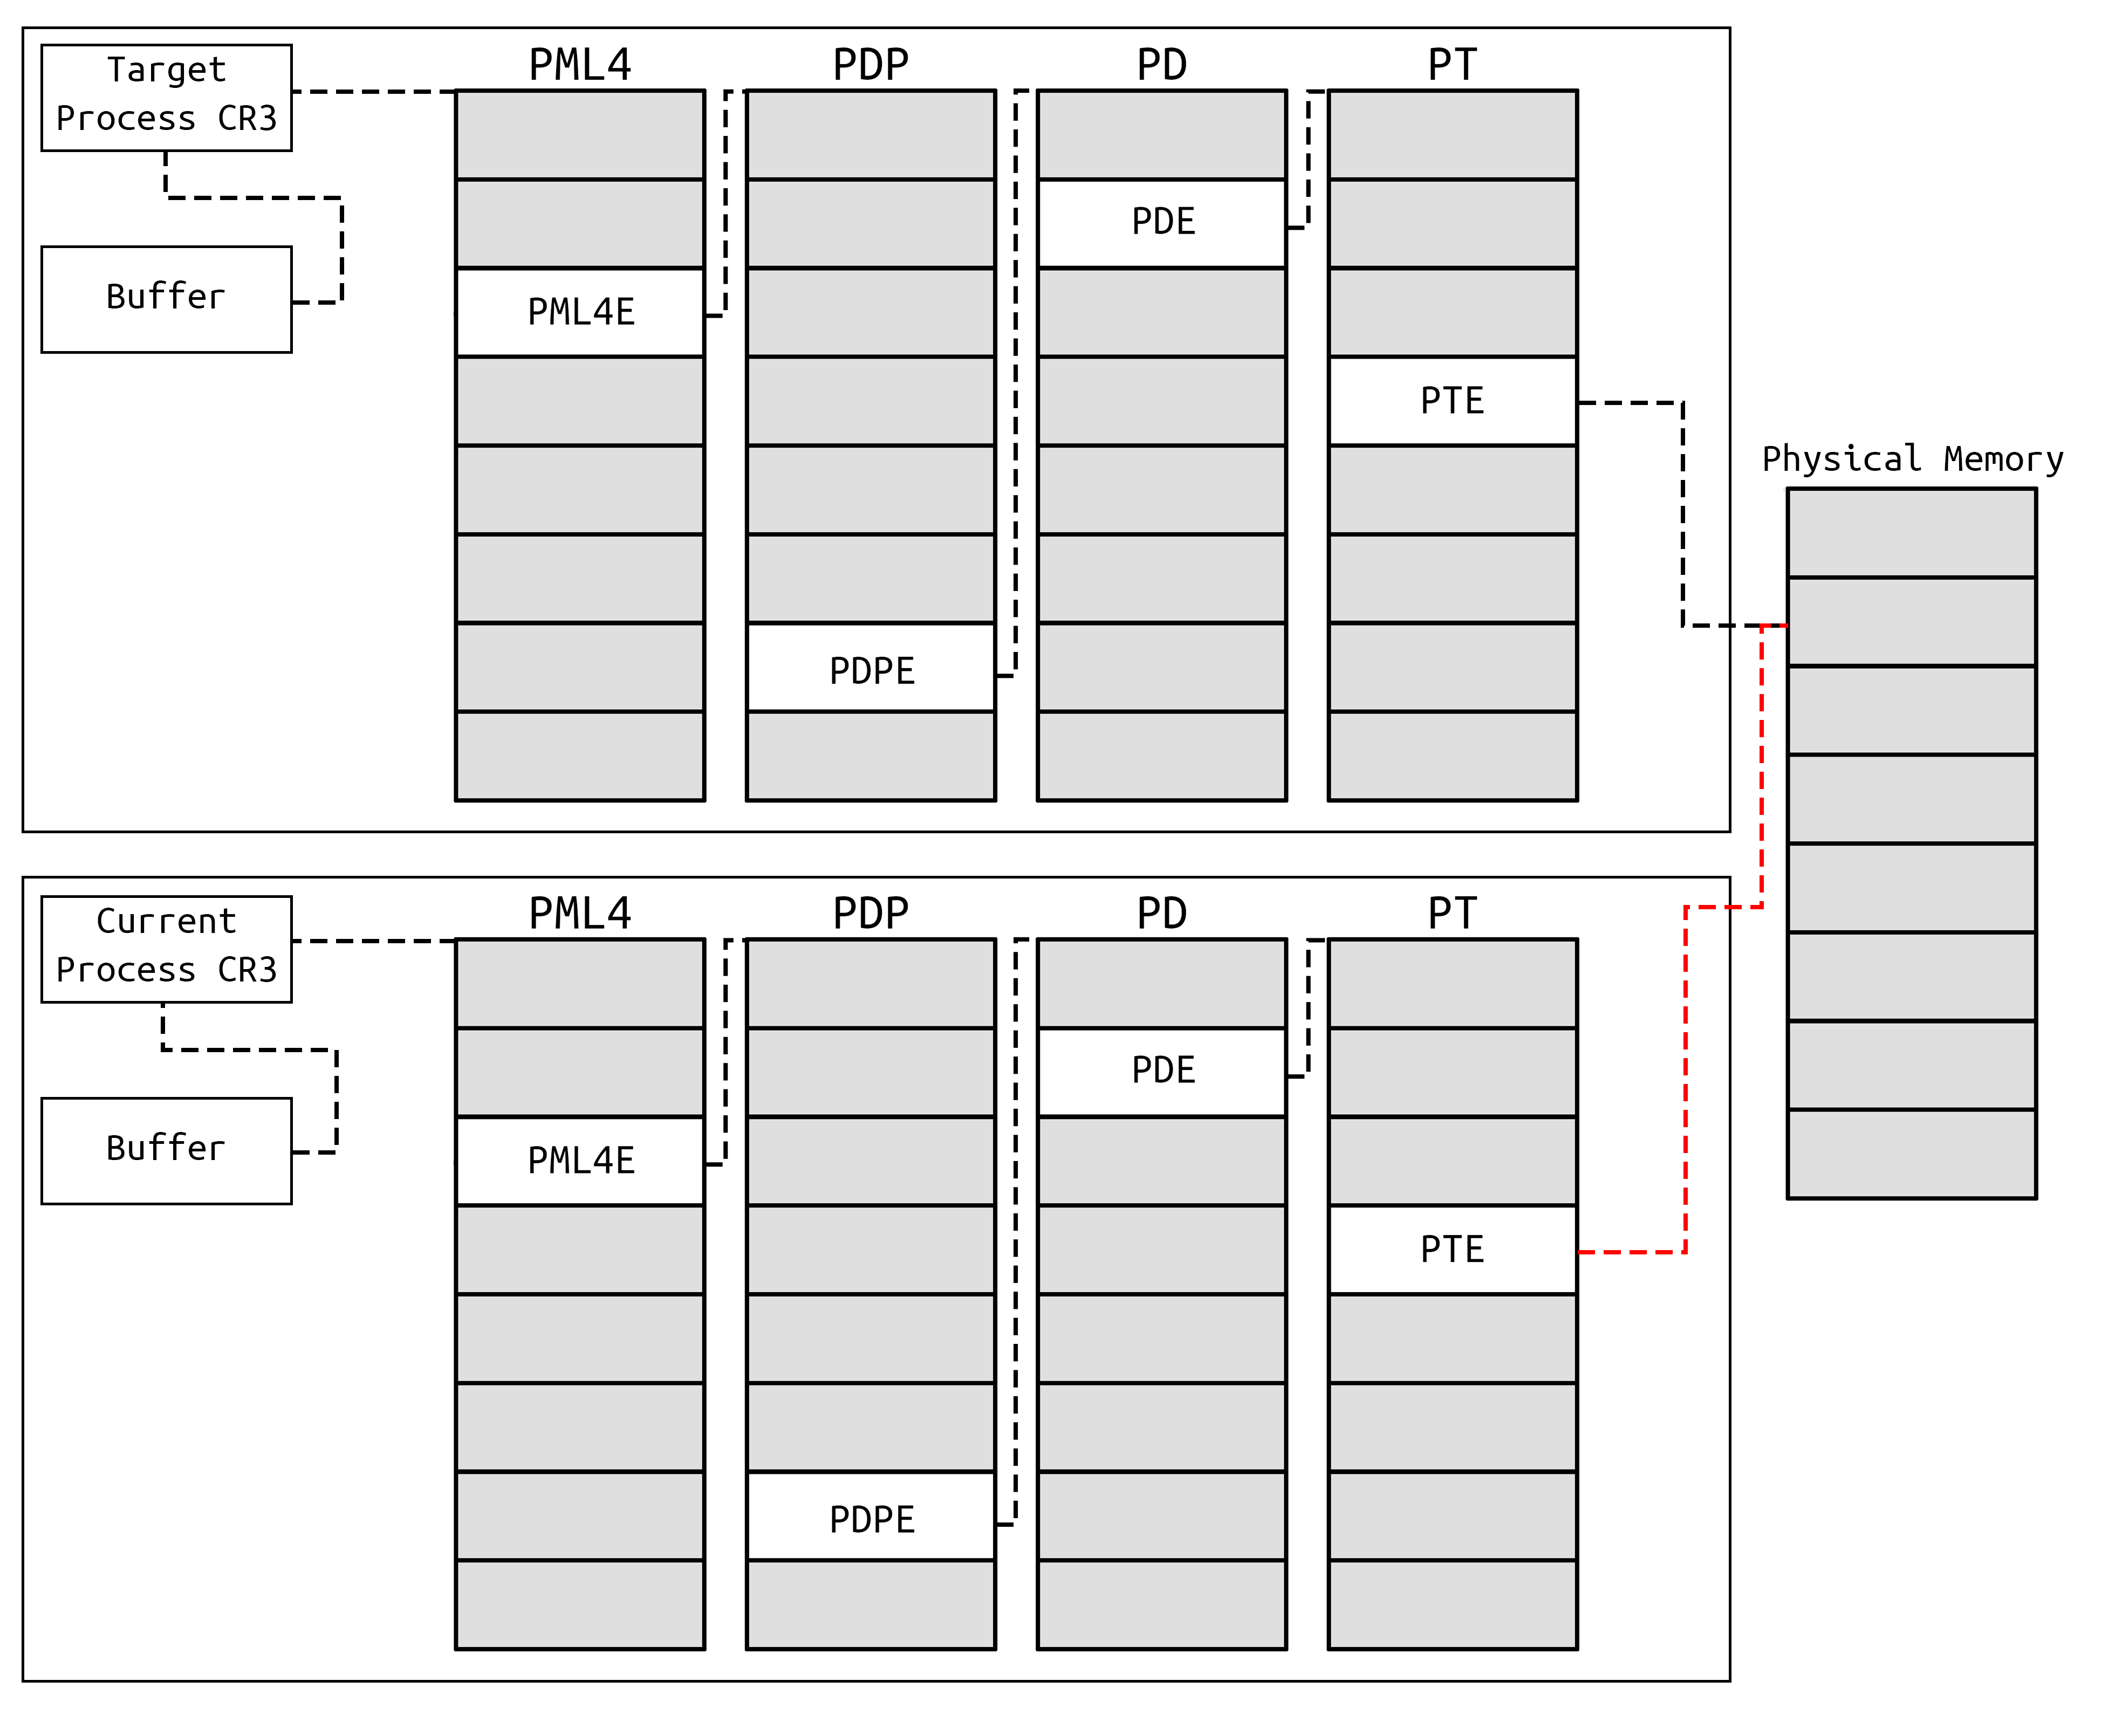
This allows us to read/write to the target memory from our own process context.
    // manuallyMappedBuf has been manually mapped to the target physical memory
    ULONGLONG* targetAddress = manuallyMappedBuf;

    // Read from target memory
    ULONGLONG readVal = *targetAddress;
    printf("[*] Read value: 0x%llX\n", readVal);

    // Write to target memory
    //*targetAddress = 0xDEADBEEFDEADBEEF;
We can apply this technique on any highly monitored/protected process such as VALORANT.
C:\Users\user\Documents\Files\Dev\Cpp\PhysMapper\x64\Release>PhysMapper.exe
[DriverLoad]: tempPath: C:\Users\user\AppData\Local\Temp\
[DriverLoad]: drvName: Xkj7sFnSMIV3vdTk
[DriverLoad]: Info: The service started successfully.
[PhysMapper]: Setting up scanners...
[DriverLoad]: Info: Service is stopping...
[DriverLoad]: Info: Service deleted successfully: Xkj7sFnSMIV3vdTk
[DriverLoad]: Info: Driver file deleted successfully: C:\Users\user\AppData\Local\Temp\Xkj7sFnSMIV3vdTk
[PhysMapper]: Trying to find: VALORANT-Win64-Shipping.exe
[PhysMapper]: Scanning for PML4Base...
[PhysMapper]: Found PML4Base: 0000000FA56B8000
[PhysMapper]: Mapping memory in current process context
[*] Read value: 0x300905A4D
With this technique, it’s important to respect the original memory privileges (RW/RO) of the allocation. By doing so, we remain compliant with VBS. Since the hypervisor only sees valid physical memory access requests, we do not run into any issues related to SLAT.
Wrapping Up
In this post, we’ve looked at the AMD64 page translation mechanism and demonstrated how the right physical memory primitives can be leveraged to access and manipulate the memory of other processes. While this post covers the core concepts, it by no means addresses all the intricacies and nuances involved in low-level memory manipulation and process exploitation on modern systems.
